
How long have you been stamping?
Since about 2002. My neighbor had a DOT party and invited me for the “head count”. The lady doing the DOT party later did Stampin’ Up! for us when our normal Stampin’ UP! lady opened her own craft store in Centralia. I joined OSA in 2007 and have been making cards here ever since.
What is your favorite technique?
Those that know me know I love love LOVE to sponge my backgrounds so that’s got to be my favorite. Second favorite is any new technique with cards.
Favorite stamp company?
There are so many wonderful companies out there and our great vendors are in the top of the list. Whenever I go to the Rubber Stamp Conventions and see someone who either makes Oriental stamps or Oriental paper, I always tell them about OSA and try to “convert” them to OSA vendors.
Favorite Asian stamps?
This is a tough one. It depends on my mood as to which is my favorite. Sometimes it’s scenery stamps, sometimes it’s the cute and cuddly panda stamps and sometimes it’s the beautiful butterfly stamps that are out there.
Favorite stamping accessory?
My Big Shot and all the die cuts and embossing folders that can go with it.
Your favorite embellishment to finish a card?
Pearls and jewels that are white or clear so I can color them with my copics and have them match my card perfectly. I also like ribbons. Because of mailing, things like flowers aren’t high on my list because they get squashed in the mail so easily.
What is the one tool you couldn’t live without?
It’s tough to choose just one tool. There are so many out there that we can’t live without. Like the cutter, the heat gun, great scissors, my sponges (naturally). My list just goes on and on.
Any helpful tips for the group?
Make cards whenever you can. Try new things when making cards. Sponge things different ways. Stamp them differently than what you normally would do. Use just part of the stamp. Cut out parts of the stamp and use just the parts. Check out different web sites for new ideas and play with them. When you buy a stamp, make a card with it before putting it away to get the feel of the new stamp and to see how it looks on paper. And, before buying a new stamp, try to think of 3 different ways to use it on a card. Three ways makes the stamp “golden”. If you can’t think of three ways, you might put the stamp back. So often we see a card and buy the stamp because the card is so beautiful but then find we haven’t a clue what else to do with the stamp.
As a member of OSA why do you like stamping in the Oriental theme?
I like the simplicity of the Asian cards when we do the SWAPS and Mingles. The red, gold and black together look so nice. My grandmother’s home was done in Asian style right down to the bamboo wall paper with gold flecks in it.
Is there any one place or city you’d like to visit to find rubber stamps?
Any city with Rubber Stamp stores is my kind of city. I would love to be able to tour Europe one of these days and check out their stamp stores. Same with Asia. But, until that happens, I have to let my fingers do the walking through the internet.
What other stamping lists or local clubs do you belong to?
I don’t belong to too many because I put all my energy into OSA when I can. I do belong to SplitcoastStampers and Wowstampers in Yahoogroups. That’s pretty much it for now.
What favorite stamping magazines would you recommend?
I love the English magazines that have the freebie stamps in them. I used to get the VSN which I also enjoyed. There are lots of good magazines out there to choose from. You need to look at them and decide if they make the style of cards you like to make or not.
Published in any magazines? If yes please list.
I believe I had a card shown in VSN one time but that’s it.
Any other hobbies, talents or craft interests?
I love to cook so between making cards and cooking for my DH and my local card groups, that eats up my time. We have lots of deer out here so deer watching and listening to the birds is another nice thing I like to do.
What inspires you to be creative?
Everything inspires me!! I might see trees going down the highway (me going down the highway, not the trees – just for clarification there) and wonder how I can make a card showing the different colors of green between the different kinds of trees. I might see a pattern on a piece of wood and try to imitate it. Or a picture in a magazine might trigger an idea. Even a card from another OSA member might get me working because it looks like the background paper was hand-made instead of store-bought so I try to imitate it.
Art background?
None, zip, nada. I took Art in Junior High school and we had to make something out of paper mache’. I started out making a horse but the legs went sideways instead of under the animal so I told Teacher it was a turtle. Your creative juices send you in some strange directions.
Have you used any unusual item in your stamping that wasn’t necessarily meant for stamping?
Yep. I’ve used tiles from my local Lowe’s store on cards. I’ve stamped on demo pieces of tile and attached hand-made paper flowers to it and given them as gifts. I’ve stamped with Staz On on tile squares and sprayed them to seal it and given them for Christmas as coasters. I used wolves and horses as the image. I’ve used the demo samples of house blinds that are tiny bamboo shades on my cards before. Other than that, I can’t think of anything else but I probably did.
Any favorite websites you would recommend for inspiration?
Check all the albums on OSA for the SWAPs and Mingles – lots of inspiration there. You can also check Splitcoaststampers for ideas as well. YouTube also has tutorials on doing certain ideas on cards that are interesting to watch. Our wonderful Lindsay has lots of tutorials on her web site that are great for card-making as well.
Do you have a day job when you’re not stamping?
Nope. Hence my name RLI = Retired, Loving It!!
Tell us about your family and where you live.
I live 12 miles outside the nearest town (small town) here in Western Washington State out on the peninsula. I am totally surrounded by fir trees. Any window I look out of, I only see nature. The deer have their fawns in our pasture. We have 5 acres with 2 1/2 of it being the parcel we live on. The other 2 1/2 is for the deer. There are about 17 resident deer here who bring their fawns in for us to see every Spring. I live here with my dear Hubby. My son and his family are presently stationed in Anchorage, Alaska so we don’t get to see them very often. He’s Army and did his stint in Korea, Germany and Iraq (twice with Iraq). He’s a career Army guy and we are so proud of him. My husband has 3 daughters from his first marriage that are about 3 hours away so we get to see them and their families on occasion.
Supplies:
- 1 piece red card stock 8 1/2 x 9″
- 1 piece black card stock 4 x 8 3/4″
- 1 piece red card stock 3 3/4 x 8 1/2″
- 3 pieces black card stock 4 1/4 x 3″
- 3 pieces white card stock 4 x 2 3/4″
- 3 pieces white card stock 3 3/4 x 2 1/2″
- 1 piece of 3D paper for punching
- Fiskars Butterfly punch
- Northwoods 3 Butterflies on Hydrangea stamp
- Oriental Background words stamp
- All Night Media Monarch stamp 553E
- Small print Oriental word background stamp
- Flower embossing folder from Quickutz.com
- Versafine black ink pad
- Stampin’ Up! Bordering Blue ink pad
- Gold Leaf pen
Instructions:
1. Score the red card stock (8 1/2 x 9″) in half lengthwise at 4 1/2″
2. Widthwise, cut a line from the edge of the paper to the center score line on one side only at 3″ from each end to make 3 equal sections to the score line.

3. On the two outer sections, score from the inside score line to the outside edge of each outer section on the diagonal.
4. Score the center section in half at 2 1/4″ width-wise.

5. Set that piece aside and take the larger set of white card stock pieces (4 x 2 3/4″). Using your Gold Leaf pen, color the gold around the edge of each of the 3 pieces of card stock. They will create a gold layer for your card. Set them aside to dry.

6. Take your Fiskars butterfly punch and punch out 3 butterflies from the 3D paper (that’s paper that looks silver and changes color as you turn it to the light). Set them aside.
7. Take your Northwoods 3 Butterflies on Hydrangea stamp, ink it up in black ink (you can use Magenta or use Versafine black like I did. I did not heat set it but did let it dry completely). Place your stamp facing up and place the first of the 3 smallest white card stock over an area you want so the butterfly is centered. Cover with typing paper and rub your hand over it to ink up the paper nicely. Remove the card stock gently and set aside. Do it again with the second piece of white card stock but over another area of the stamp that has another butterfly. The third piece will be stamped with another stamp.

8. For the third piece of white card stock, I inked up my Oriental background word stamp (from one of our vendors) in the Bordering Blue ink and placed the small piece of card stock on top of the stamp (again with the typing paper) and rubbed on the pattern.

I then stamped the Butterfly stamp from All Night Media over the Oriental words.
9. Color in all three pieces using copic markers.
10. Mount the three colored pictures on the gold framed pieces using double-sided tape. Mount the gold framed pieces to the black pieces with double-sided tape.

11. Take the large piece of red card stock and fold on the score lines, folding in towards the inside of the card:

12. Put double-sided tape only on the folded down parts of the red card stock above (the large piece) and attach the 3 stamped pieces, lining up to the bottom of the pieces.
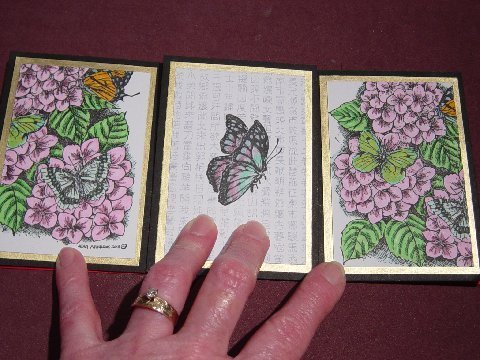
13. Place the large black piece of card stock on the inside of the card, centering it. Emboss the red piece with the embossing folder and mount it on top of the large black piece. Bending the scored part of the top pieces, see where you want your stops to hold up the images and place the butterflies there, mounted with foam tape.

Your card is now finished.

The cool thing about this card is you can make one for any occasion. If it’s an Anniversary, you could put a Wedding picture in the center and one of each person as a child in the two outer pieces. Or you could have a family picture in the center and children in the outer ones.
This card, as I made it, would require a hand-made envelope but if you cut the measurements down and made the base piece 8 x 9″, it would fit nicely in a legal envelope for easy mailing. Be sure to cut down the other parts as well.
Sincerely,
Rli


Huge congratulations – most interesting reading – where you live sounds like Heaven – great project as well -what a bonus hugs Leo
Congratulations Margo. You always amaze me with your creativity. Your cards are always works of art. Thank you for such such a wonderful tutorial.
Hugs & Blessings,
Barbie D.
Great to read your profile and see your awesome project…WOW! Congratulations…and enjoy your month…keep smiling! XOXO
Sandra Grimes
A well deserved OSA SAM accolade. I love your project and learning more about you!
Fantastic project, Margo. Your art is always the best of the best and it was about time you were nominated for SAM. YOU are very deserving and also a great hostess for swaps. A big congratulations!
awesome, and congrats! you deserve it, Margo. I loved reading it all and also the project is something I have never seen before however curiously saw the hydrangea stamp on another blog yesterday and she just used the centre of the stamp.
… loved the tip on only buying a stamp if you can think of three ways of using it if only I did that more often!!
love Shaz.x
Hi Margo
well deserved recognition for YOU and your many contributions to OSA. Love the project too.
Barb I
Great job Margo. I love this card. Hopefully I will make one one day. Thanks for sharing your card making journey with us.
Kim M
Congrats to you- loved reading your bio and can only imagine the beauty out your windows! Your project is just fabulous- loving the butterfly and the floral images as well. Thanks for all of the inspiration and great tip advise on the OSA site!
Congratulations, Margo. Your art is always so nice and you are always so generous with your time and tips! The recognition is well deserved! Enjoy!! Renee LW
Hi Margo; I came here looking for a contact; received your lovely card in the mail yesterday. My blog has a contact form …we can take it from there